
At my employer we recently decided to switch over to Office 365. During the migration periode I have set-up our Exchange 2010 server in Office 365 hybrid mode. Also set-up the Azure Active Directory Sync. All existing users being sync both ways, perfect!
But then it happend. New users. All seemed working OK, until we noticed two users were not receiving e-mail from IT. What could be the problem here?
The Problem
The IT department’s mailboxes have already, for testing purposes, been migrated to the Exchange Online environment. But the mailboxes of the rest of the users are still located on the on-premise Exchange server.
After going into full Sherlock mode, the problem became clear. The two users both had a mailbox on the on-premise Exchange server and in the Office 365 cloud.
How did this happen? Well, my best guess is that after the user-account was created in active directory and had been synced to Office 365, instead of creating the on-premise mailbox first, the Office 365 license had been assigned to the user. As Office 365 did not see a corresponding on-premise mailbox, it then created a cloud mailbox for the users. After all this happened, the mailbox was created on the on-premise Exchange server. Resulting in the situation that all-non-IT users could directly e-mail the users. The e-mail send by IT was delivered in the Office 365 mailbox. Since the new users’ Outlook was connected to the on-premise Exchange server and not Exchange Online, the user did not see the e-mail send by IT.
Tools
To fix the problem you will need the following pieces of software installed:
- Microsoft Online Services Sign-in Assistant 64-bit
- Windows Azure Active Directory Module for Windows PowerShell 64-bit
Fix
Now… How to fix this mess 🙂
Attribute filter in Azure AD Connect
First we need to temporary stop syncing the useraccounts to Azure Active Directory. We’ll achieve this by creating an attribute-filter in Azure AD Connect. We will be creating a negative filter; a do-not-use-these filter. We will be checking if extensionAttribute15 will have the value nosync.
- Sign-in to the server running Azure AD Connect. Make sure you are using an account with the propper credentials.
- Start the Synchronization Rules Editor
- Select Inboud and click Add New Rule.
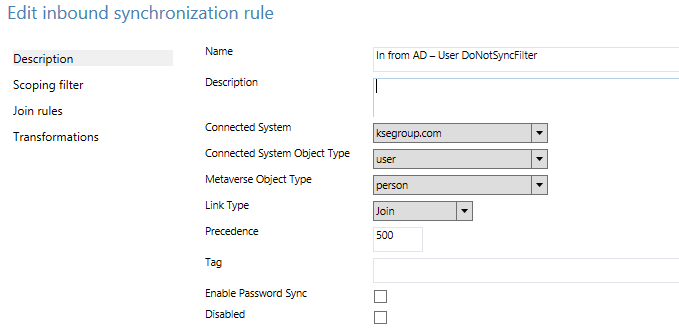
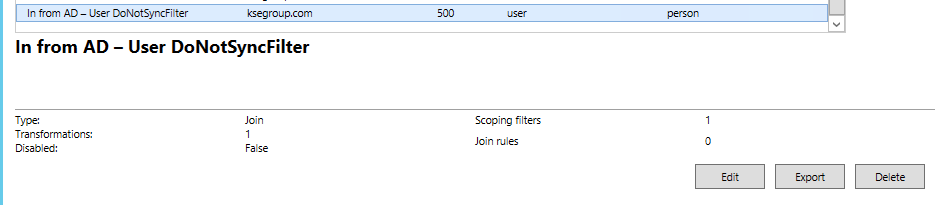
- Give the rule a name you’ll understand later. I used “In from AD – User DoNotSyncFilter”. Now set as following:
- Connected System: the forest in which the user exists
- Connected System Object Type: User
- Metaverse Object Type: person
- Link Type: Join
- Precedence: A number not in use by another rule. In my case I could use 500
-
Inbound Rule description - Now click Next
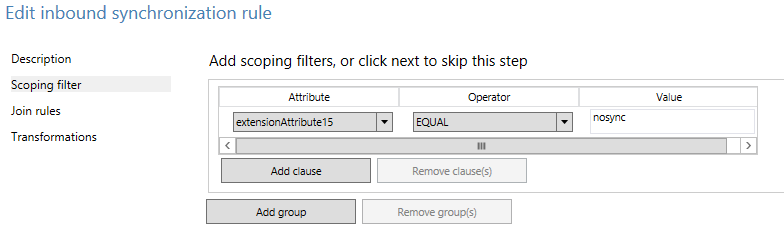
- In Scoping filter screen we’ll be setting the actual filter. Click Add Group and then Add Clause. Set as following:
- Attribute: extensionAttribute15
- Operator: EQUAL
- Value: nosync
-
Scoping Filter - Now click Next
- You can leave the Join Rules section empty. Click Next
-

Join Rules
-
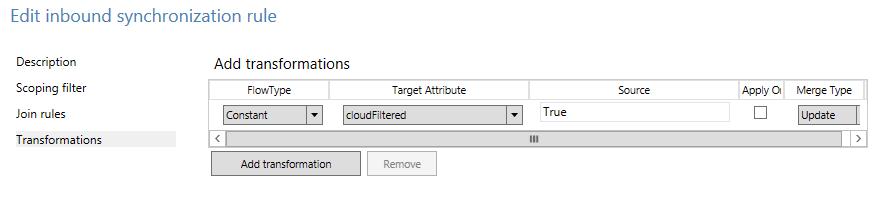
- In the Transformations screen click Add Transformation and set as following:
- Flowtype: Constant
- Target Attribute: cloudFiltered
- Source: True
-
Transformations
- Click Add to save the rule
-
The DoNotSync Rule
Set the attribute
We now have to set the extensionAttribute15 to nosync for the user(s).
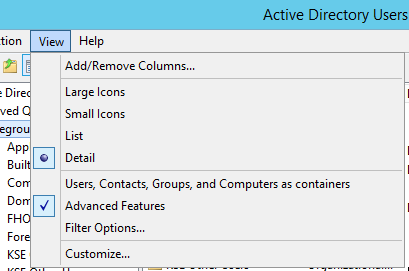
- Open Active Directory Users and Computers
- Make sure you have enable Advanced Feautures
- View > Advanced Features
-
AD U&C Advanced Features
- Now open the user object and open the tab Attribute Editor
- Scroll to extensionAttribute15 and select it. Now click Edit and set the value to nosync
-
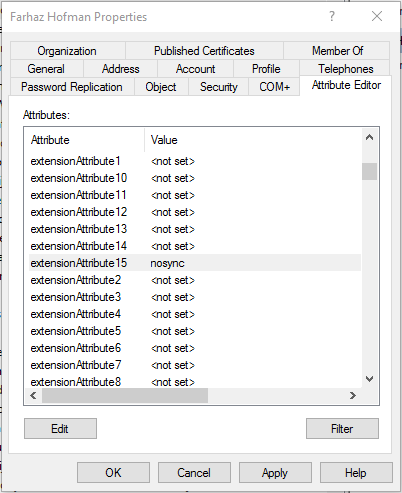
extensionAttribute15 set to nosync
-
- Click OK twice
Force Full Sync
After adding or removing a attribute based filter rule. You’ll need to start a Full Synchronization.
- Sign-in to the server running Azure AD Connect. Make sure you are using an account with the proper credentials.
- Start the Synchronization Service application
- Click on Connectors and select the connector you just added the filter to
-
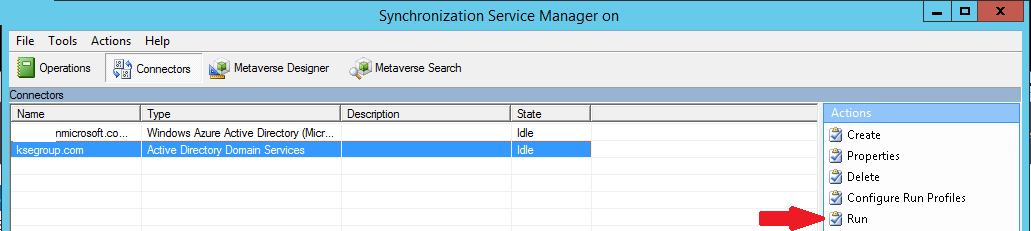
Connectors
-
- Click on Run the right side.
- Now select Full Synchronization and click Ok
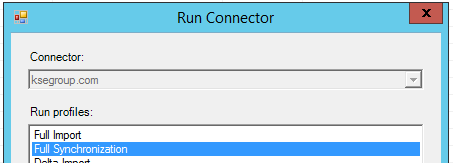
- Run Full Sync
Now wait until a full synchronization cycle has passed. You’ll see that in Office 365 the user won’t be active anymore. The license it had assigned to can be reused.
Remove mailbox from Recycle Bin
Although the user isn’t active anymore, we’ll have to remove the user from the Recycle Bin before we can continue.
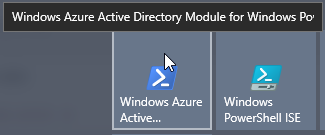
- Start by opening Windows Azure Active Directory Module for Windows PowerShell
- Now connect to your Office 365 environment
- First get your credentials in a variable with this command
-
$usercred = Get-Credential
- Now connect to the service with this command
-
Connect-MsolService -Credential $usercred
- We now have to retrieve the ObjectID of the deleted mailbox. Using the following command we’ll get a list with mailbox username and corresponding ObjectID
-
Get-MsolUser -ReturnDeletedUsers | FL UserPrincipalName,ObjectID
- Make sure you write down or copy/paste the ObjectID to your favorite editor.
- Now we can remove the deleted mailbox from the recycle bin. Use the following command:
-
Remove-MsolUser -ObjectId <GUID> -RemoveFromRecycleBin –Force
- The mailbox has now completely been remove from the Office 365 environment.
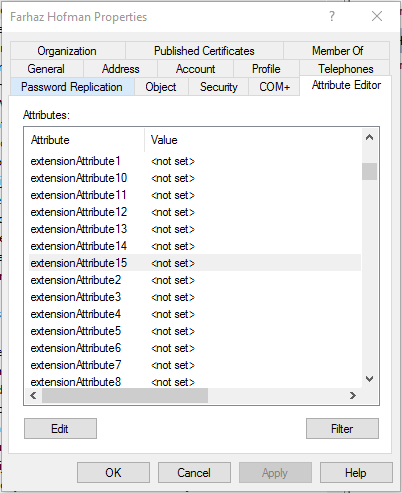
Unset Attribute
We now have to clear extensionAttribute15.
- Open Active Directory Users and Computers
- Now open the user object and open the tab Attribute Editor
- Scroll to extensionAttribute15 and select it. Now click Edit and click Clear.
-
extensionAttribute15 cleared
-
- Click OK twice.
Finishing up
After clear the attribute, the user will be synced to Office 365 again. When it’s resync, you’ll be able to assign a license again and because the on-premise mailbox is present, a Exchange Online mailbox will not be created.